
Ready to give your yard a facelift? It’s simpler than you’d think! With our DIY Landscape Edging tutorial, you’ll master the art of creating beautiful, defined edges that’ll really make your garden pop. Don’t worry if you’re not a seasoned DIYer – we’ve got you covered with a step-by-step guide, helpful tips, and common mistakes to avoid. So, let’s roll up our sleeves and dive in, shall we?
Understanding the Basics of DIY Landscape Edging
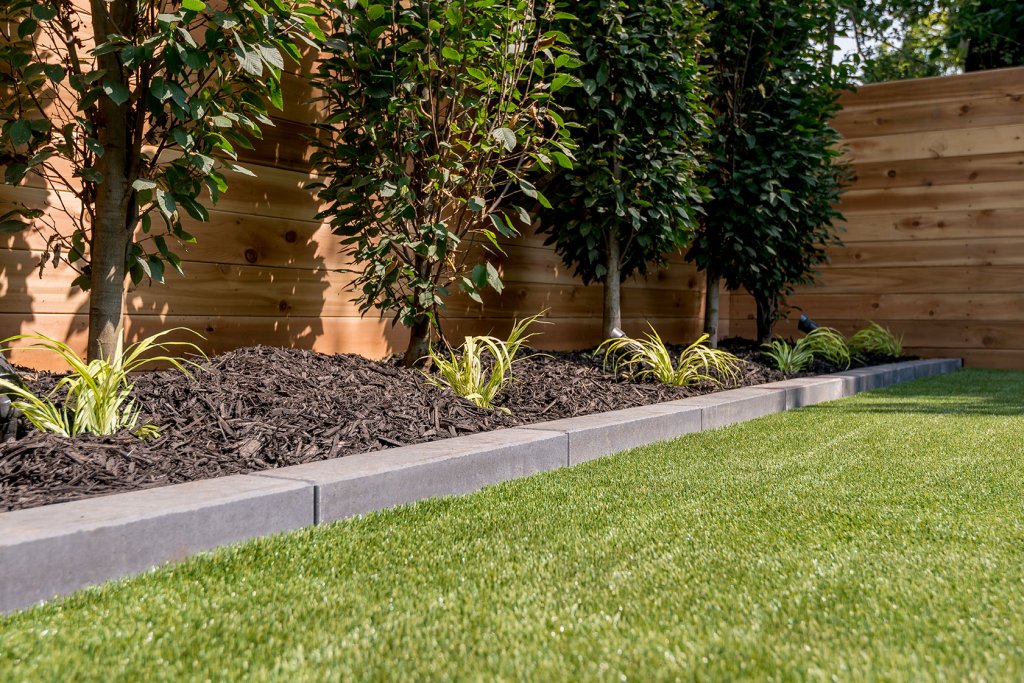
Before we dive into the step-by-step tutorial, let’s ensure we’ve got the basics of DIY garden edging down pat. Landscape edging is a technique used by gardeners to create a neat and tidy boundary between different areas of your yard. Whether it is between your lawn and flower beds, or your patio and vegetable garden, landscape edging can make a world of difference in terms of aesthetics. One can use various materials for edging such as stone, brick, plastic, or wood. Each material has its own set of advantages and considerations. Understanding these basics is crucial as it will guide you in choosing the right material and technique for your DIY landscape edging project. Now, let’s delve deeper into the process.
Gathering Necessary Tools and Materials
You’ll need to gather all the necessary tools and materials to begin your project efficiently. These include a garden spade or edger, a garden hose or string to mark the area, wooden stakes or edging blocks, and a rubber mallet. You may also need landscape fabric and mulch, depending on the type of edging you’re installing. Remember, safety should always come first; so, do not forget your gloves and safety glasses. The quality of your tools can significantly influence the final result of your DIY landscape edging project. Therefore, it’s crucial to invest in good quality tools. With all the necessary tools and materials at hand, you’re ready to move on to the next step of your project.
Step-by-Step Guide to Setting up Your Landscape Edging
Now that you’ve got your tools and materials, it’s time to dive right into setting up your garden border. Begin by marking out the area where you wish to place your edging using a garden hose or string. This will give you a visual guide to follow. Next, using a spade, dig a trench along your marked line. The depth and width of the trench will depend on the type of edging you have chosen. Place your edging into the trench, ensuring it’s level as you go. Fill any gaps behind the edging with soil and firmly pack it down. This will provide support and help keep the edging in place. There you have it, your garden border is set! Don’t forget to clean up and store your tools safely.
Tips and Tricks for Maintaining Your Landscape Edging
Maintaining your garden border isn’t as hard as it seems, especially if you’re armed with a few handy tips and tricks. Regular checks for damage or wear are the first step to ensure your landscape edging remains attractive and functional. Be proactive, do not wait for visible damage to occur. Instead, make it a routine to inspect your edging after extreme weather conditions.
Also, remember to weed your garden regularly. Weeds are more than just an eyesore; they can damage your edging over time. Use a weed trimmer for harder-to-reach spots. Moreover, replace any broken parts immediately to prevent further damage. Lastly, invest in high-quality materials from the start. They may cost more upfront, but they’ll save you money in the long run by reducing repair and replacement costs.
Common Mistakes to Avoid in DIY Landscape Edging
While crafting your own garden border, it’s crucial to dodge common mistakes that could potentially harm your project’s overall appeal and functionality. One common error is neglecting to consider the overall aesthetic of your garden. The style of your edging should complement, not clash, with your landscape’s style. Another mistake is failing to prepare the ground properly. This can lead to an uneven border that’s more susceptible to damage over time. It’s also important to avoid using materials that aren’t durable or weather-resistant. You want your border to be able to withstand different weather conditions without losing its charm. Lastly, don’t underestimate the importance of regular maintenance. Without it, even the most beautifully crafted border can become an eyesore. Avoid these mistakes to ensure a successful DIY landscape edging project.
Frequently Asked Questions
What Are Some Eco-Friendly Alternatives to Traditional Landscape Edging Materials?
Eco-friendly alternatives to traditional landscape edging materials include reclaimed wood, bamboo, recycled rubber, and stone. These materials are sustainable, durable, and can add a unique aesthetic to your garden or yard.
How Do I Incorporate Landscape Edging Into a Sloped or Uneven Garden?
Incorporating landscape edging into a sloped or uneven garden requires careful planning. It’s necessary to contour the edging to the land’s natural shape, securing it firmly to prevent shifting due to the slope.
Can Landscape Edging Be Used to Deter Pests From My Garden?
Yes, landscape edging can help deter pests. When installed correctly, it can create a physical barrier that prevents pests from accessing your garden. Additionally, it can enhance your garden’s overall aesthetic appeal.
How Do Different Climates or Weather Conditions Affect the Durability of Various Landscape Edging Materials?
Different climates significantly impact the durability of landscape edging materials. For instance, harsh winters can crack plastic edging, while intense sunlight might fade wood. Therefore, it is essential to choose materials suitable for your local weather conditions.
What Are Some Creative Design Ideas to Make My Landscape Edging More Visually Appealing?
Creative landscape edging designs can significantly enhance your yard’s visual appeal. Consider using contrasting materials, integrating lighting, creating curves instead of straight lines, and incorporating plants for a natural, aesthetically pleasing border.
Conclusion
In conclusion, DIY landscape edging isn’t as daunting as it may seem. With the right tools, materials, and guidance, you can easily create a stunning edging for your garden. Remember to maintain it properly to prolong its lifespan. Avoid common mistakes that can ruin your hard work. With patience and creativity, you’ll have a beautifully edged landscape that’s the envy of your neighbors.