

Building a backyard pitching mound offers numerous benefits, including cost savings and customized practice space.
This guide aims to simplify the process, ensuring your mound withstands weather and play-related wear and tear.
Constructing a backyard pitching mound requires commitment, time, and effort.
Creating a backyard pitching mound is a cost-effective alternative to expensive commercial options.
This guide provides practical tips and tricks to help you build a durable and safe pitching mound in your backyard tailored to your specific needs.
Not only does a well-constructed backyard pitching mound provide a convenient practice area, but it also ensures safety for players.
Let‘s embark on this journey to create a robust, reliable pitching mound in your backyard.
Before we dive into the details, gather all the necessary materials for your backyard pitching mound project.
Key Considerations Before Building Your Backyard Pitching Mound
Before directly jumping to the guide, consider these significant points.
1. Focus on the Clay
The quality of your backyard pitching mound significantly depends on the type of clay you choose.
Experts recommend using a common infield blend clay for the mound‘s back and sides and a more solidified clay for the landing and plateau areas.
A typical infield blend contains about 10% silt, 20% clay, and 60% sand.
For areas requiring more durability, like the landing zone, opt for a blend with 10–20% silt, 40–50% clay, and 40% sand.
These bagged mound blends are widely available from various suppliers.
Choose blends that are easy to handle and have a high clay content for the best results.
Regarding quantities, you‘ll need approximately 8-10 tons of clay to build your mound.
This includes 6-8 tons of the infield blend and 2 tons of the more robust clay.
Preparing the right amount and type of clay is crucial for a stable and durable backyard pitching mound.
2. Get the Exact Orientation
Start by accurately mapping the orientation from your mound to the home plate.
Use laser or string lines and transit for precision, ensuring the mound, home plate, and second base align correctly.
This step is essential in creating a functional backyard pitching mound.
Be mindful of the pitcher‘s rubber placement.
It’s a common mistake to place it at the center of the mound, which can affect the game’s dynamics.
Measure carefully to avoid this. Also, protect any grass around the construction area with plywood and geotextile to prevent damage.
With these preparatory steps completed, you can start building your backyard pitching mound.
This guide provides a step-by-step approach to creating a quality mound suitable for practice and play.
3. Choose the Area
When building a backyard pitching mound, the first step is to choose the right area.
Look for a spot in your backyard that can comfortably accommodate the mound and home plate.
The selected area should be level to ensure stability and ease of construction.
Consider the appropriate measurements for your mound based on the softball or baseball league‘s regulations, especially considering the age group of your players.
This includes the dimensions for the pitching rubber’s location, height, and circumference, as well as the distance from the mound to the home plate.
Remember, as players grow, these dimensions might need adjustment to cater to the changing league requirements.
Selecting and preparing the right area is crucial for a functional and safe backyard pitching mound.
4. Preparing the Ground
The ideal site for a backyard pitching mound is a level area.
An even terrain, not on a slope or hillside, is essential for safety and accurate pitch dynamics.
If your chosen location isn’t level, bring in fill dirt from a reliable supplier to even it out.
Fill in any holes or low spots to create a surface that mirrors a professional baseball field.
This not only improves the functionality of your mound but also minimizes injury risks associated with uneven playing surfaces.
Preparing the ground effectively lays the foundation for a high-quality backyard pitching mound.
These steps ensure your pitching mound is functional and a safe addition to your backyard.
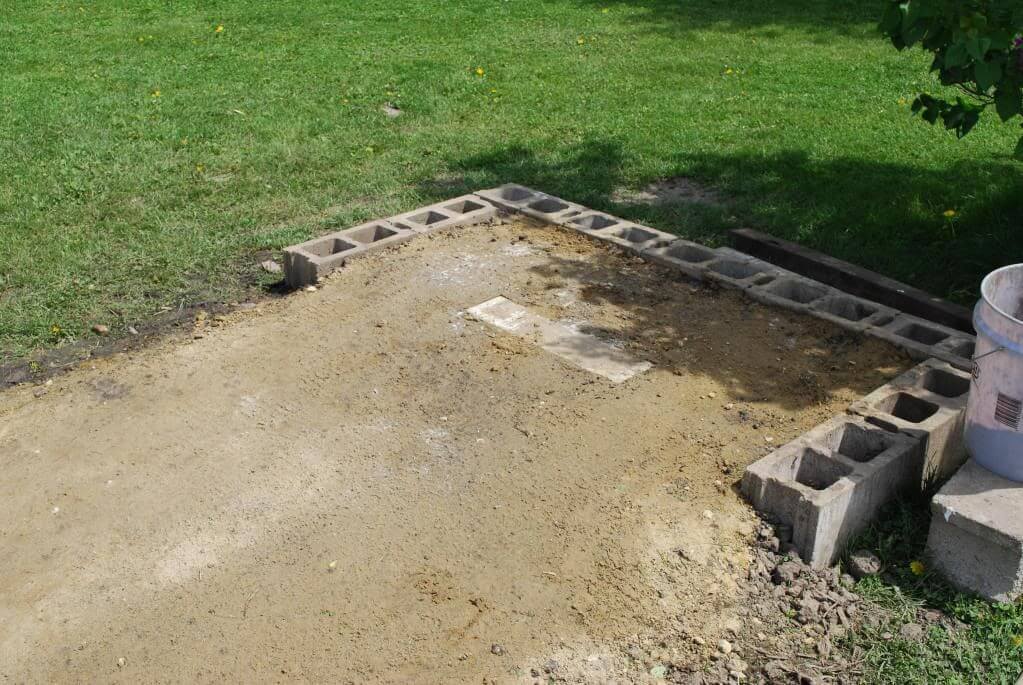
5. Dig out the Turf
Begin by accurately measuring and marking the area for your backyard pitching mound.
Use spray paint to delineate the home plate area and the mound‘s circumference.
This visual guide will assist in precise construction.
Remove all turf within the marked area to create a smooth, even base.
Once you‘ve cleared the turf, use landscape fabric to cover the area, securing it with landscape staples to prevent weed growth.
This step is crucial for maintaining a clean and stable foundation for your mound.
Find the center of your marked circle and place a stake at this point using a hammer.
Use a yardstick or tape measure to determine the desired height of your mound and mark this height on the stake.
This marker will indicate when you‘ve added enough dirt to your mound, ensuring the correct height for your backyard pitching mound.
6. Construct the Mound
While you can purchase pre-made mound clay, a more economical option is to source clean fill dirt from a local supplier.
Clean-fill dirt is ideal because it lacks organic material, preventing unwanted vegetation and weed growth.
Ensure the fill dirt is free of impurities like metal, wood, rubble, and other contaminants.
Quality fill dirt should contain at least 50% clay, allowing for easy compaction and a stable base that resists sinking or collapsing over time.
Start by laying fill dirt over the landscape fabric at the mound’s location.
Apply an inch of dirt over the entire marked area and pack it down to create a smooth surface.
Repeat this process, adding and compacting the dirt one inch at a time.
Gradually decrease the diameter of each layer by 3-6 inches as you build upwards.
Continue this process until the mound reaches the desired height marked on your central stake.
Ensure the mound’s surface is rounded and smooth, filling in any gaps as needed.
This step-by-step approach will help you create a well-constructed and durable backyard pitching mound.
7. Installation of Pitching Rubber
Once your backyard pitching mound is constructed and the surface is smoothed, the next step is installing the pitching rubber.
The key here is to ensure that the rubber is immobile, secure, and lies flat on the mound.
You can achieve this by burying the rubber partially or staking it firmly into the mound.
Proper installation of the pitching rubber is crucial for a functional and regulation-compliant backyard pitching mound.
8. Measuring the Distance from the Pitching Rubber to the Home Plate
An integral part of constructing a backyard pitching mound is establishing the correct distance to the home plate.
If you haven‘t already marked this distance, do it now. The distance varies depending on the league and level of play:
- For Little League softball, it should be between 35–40 feet.
- For high school softball and beyond, aim for approximately 43 feet.
- In baseball, the distance should be 46 feet for Little League, 50 feet for intermediate leagues, and 60 feet for high school and above.
These measurements are essential to ensure your backyard pitching mound meets standard play requirements and provides a realistic practice environment.
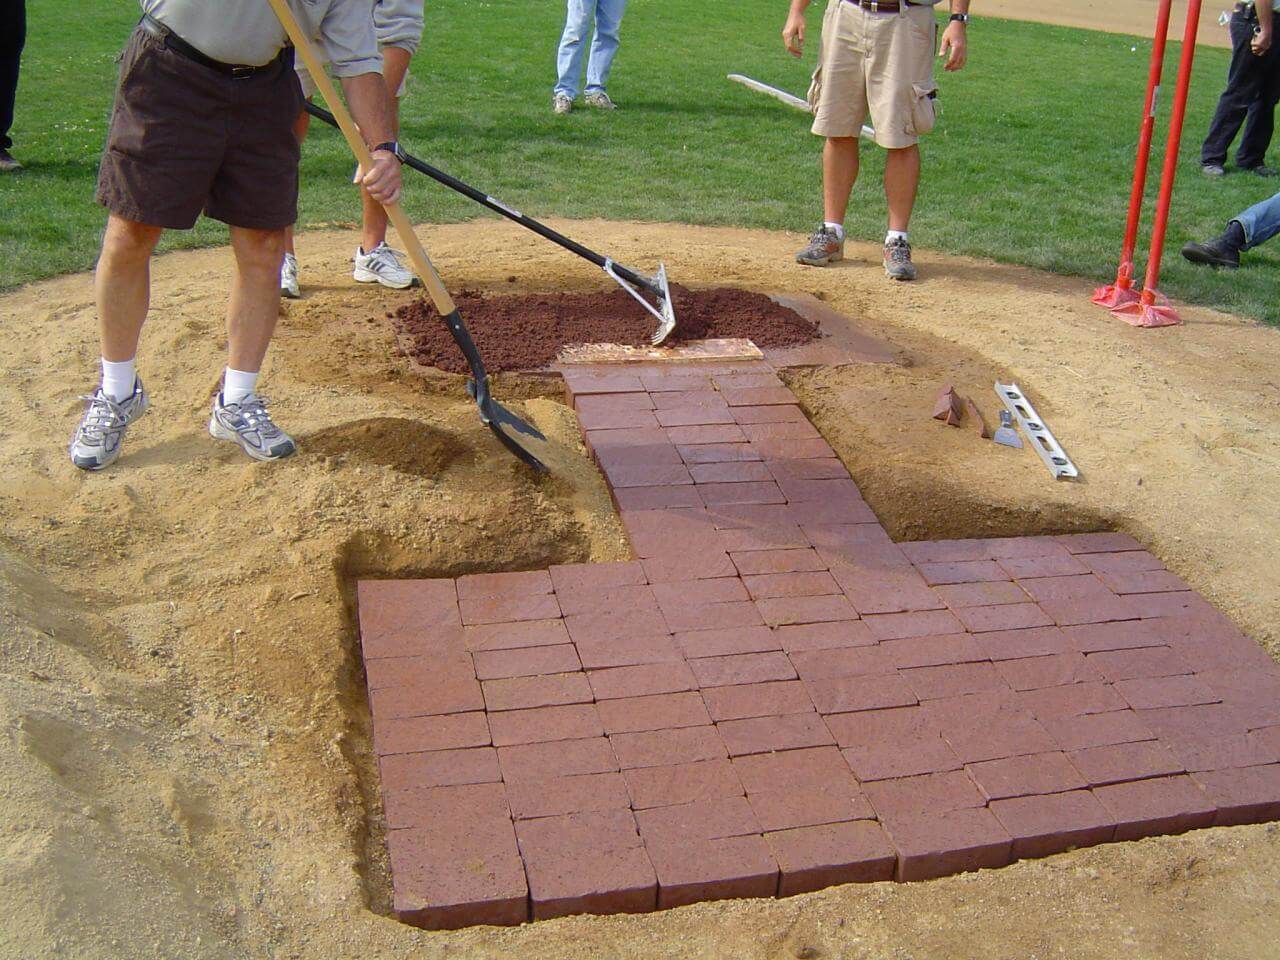
9. Installation of Home Plate
Once your backyard pitching mound is in place, install the home plate.
Begin by excavating the turf to a depth of approximately 3 inches in the designated home plate area.
Use the exact measurements for the batter‘s box to guide your digging.
Cover this area with landscaping fabric to prevent weed growth and lay a foundation of fill dirt, packing it down firmly.
Then, install the home plate precisely in its designated position.
10. Adding Finishing Touches
After constructing your backyard pitching mound, apply a 1/8-inch layer of infield conditioner to the mound‘s surface.
This helps prevent the soil from sticking to the tamp and maintains the mound’s condition by preventing cracking and drying.
Regular covering of the mound is also recommended for long-term maintenance.
Final Words
Building a backyard pitching mound is a rewarding project that enhances your practice experience, whether you‘re a budding baseball player or a Little Leaguer.
This guide offers a cost-effective alternative to purchasing expensive commercial mounds.
With dedication, basic tools, and the right clay soil composition, you can create a high-quality pitching mound in the comfort of your backyard.
Leave a comment and tell us in the comments section which tip was the most helpful.