
Board and Batten are probably the quickest, easiest, comfortable, and less time-consuming DIY you can encounter. Now and then, we wish to change our walls and turn them into something exciting, be it new paint, texture, board and Batten, new shelf, etc. With new changes, your home also feels new, as if you just moved in.
DIYs are so in demand these days because they save so much cost, and most importantly, you had all the items you need in your very home, and you just had no idea. Board and Batten Wall is a DIY wherein you put wood or MDF or redwood or any other material and put them up on your wall in different patterns or designs.
No matter where your wall is, be it inside, outside, in the bathroom, in a bedroom, in an entryway, it does not matter. It would help if you had a blank wall that you want to convert into mesmerizing effects.
There are some essential factors to keep in mind, but other than doing this, DIY can be a fun activity for you and your partner, and maybe your kids, if they are helping rather than destroying or creating more havoc.
We will tell you about two types of Board and Batten DIY that you can try, the first one for your entryway and the other for your bedroom. You can also come up with your creative ideas.
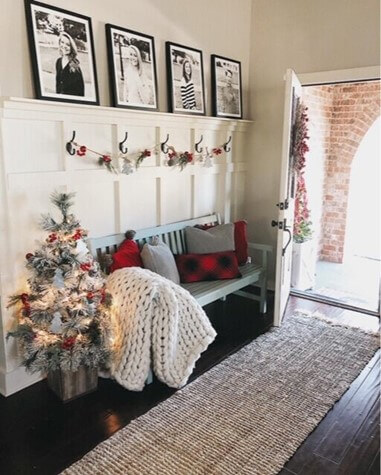
For Your Entryway
This Board and Batten DIY is perfect for your entryway or your corridor. Let us see how we must do this.
Step 1:
Gather your materials you will require for your DIY, like your wood, liquid nail gun, measuring tape, paintable caulk, etc.
Step 2:
Measure your wall where the Batten will be placed. This is the essential step. You need to make this up in your mind beforehand about how many battens you want on your wall, 5, 6, 7, etc. Measure all things together and write them down before starting your work.
Step 3:
Start by hanging your top horizontal board, which should be higher till your front door is. It can be as high as 64 inches from the base or more, depending upon your door. Using a level, you can measure the top board. Use the nail gun to fix your first top board on the wall.
Step 4:
It is now time to put up your first Batten. As in Step 2, you would have already measured the space between your battens, and you need to put the nail gun on the wood and stick them up on the wall.
Step 5:
In this DIY, we are using the horizontal cross-trim method. Place another horizontal board 15 inches down from your top board, or you can first see for yourself how much you want and then hang it.
Step 6:
Your construction work is now done. It is time to paint your wall. You can use paintable caulk and spackle both to fulfill your painting needs.
Step 7:
The last step is to hang your coat hooks and decorate your DIY with wall hangings and maybe an elegant carpet.
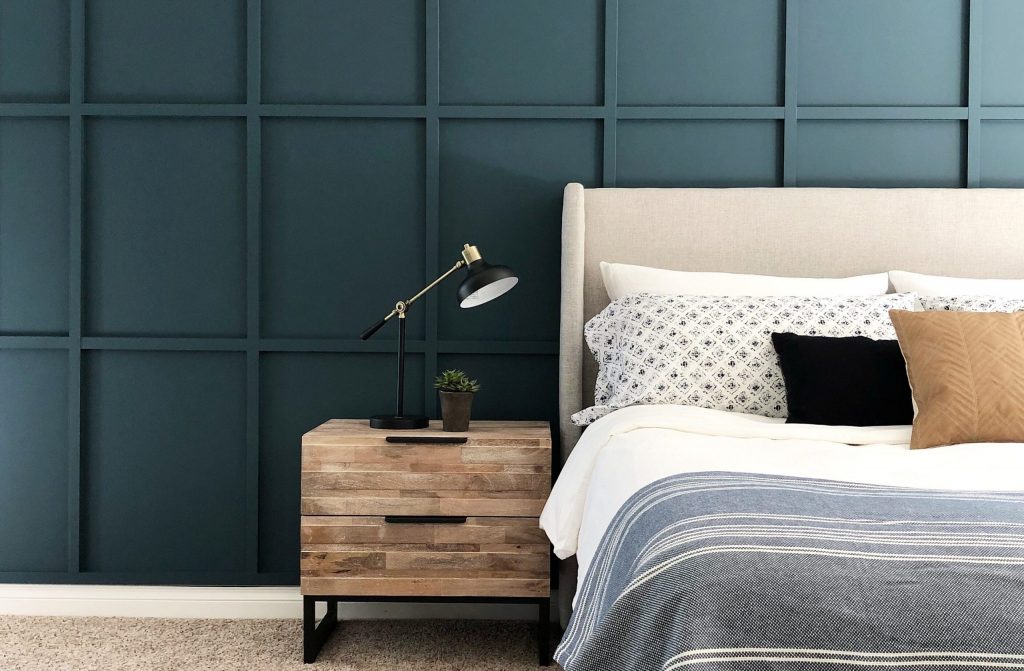
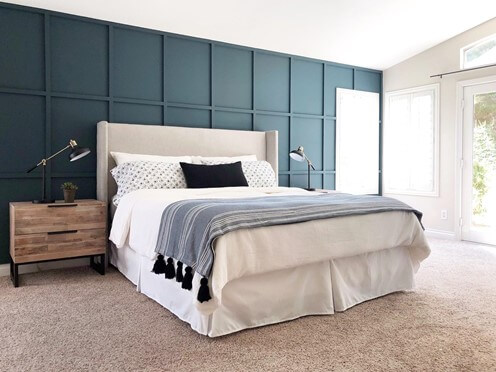
For Your Bedroom/Living Room/Kitchen/Outdoors
This type of Board and Batten DIY is perfect for your bedroom or kitchen because of how it comes out. Let us look at the steps.
Step 1:
Gather your materials like Wood/MDF, Nails, Liquid nail gun, Sandpaper, Paintable caulk, and a backer board if your walls are textured.
Step 2:
Start measuring your wall for the battens, and this step should be done before you purchase your wood.
Your trim pieces will be going left, right, top, and bottom. After measuring your trim pieces, you can figure out if you need a backer board for your walls or not.
Step 3:
If you are using the backer board, you need to cut down the window and outlet holes. You can measure those on your board and then cut them out.
Lastly, please put on the liquid nail gun, stick it on the wall, and nail it down from outside.
Step 4:
It is now time to put the wall of the batten pieces, and it is recommended to put it in this order, top, bottom, left, right.
Start by putting the vertical battens, one by one. The easiest way to put them in an equal distance is by measuring their gap using a lever.
After you are done with the vertical battens, place the horizontal battens in the same manner. Glue all of them down and nail them.
Step 5:
This step is essential, fill all your nail holes with sandpaper or wood filler, and use paintable caulk on the edges. Use the caulk where your pieces meet the wall and make it evenly smooth.
Step 6:
You can now tape your walls before you begin painting.
Step 7:
Start your painting using a paint sprayer or a roller, whichever you find is comfortable. You can use any paint you want; it depends on your mood.
However, if your wall is painted with a color you love, then do not worry. You can get the same color for your battens too. Now your DIY is complete.
These two DIYs are basic examples of how you can style your home with a Board and Batten DIY idea. Be it indoors or outdoors, and in any room of your home, you can use this technique and completely change your game.
All your friends will feel as if you have changed your whole house but what you have done is merely put up some batten pieces. This DIY is easy and works in any home, be it a smart home, a rustic home, a marble textured home. It is also significantly less time-consuming and hence is merely a weekend job done right.
DOs and DONTs for the Board and Batten DIY
DOs
Correct Measurements
The essential step in this DIY is the correct measurement. When you measure your walls, the distance between the battens both horizontally and vertically, you should measure them at least three times before finally putting them on your wall.
Sometimes when you have the correct measurement written down, you miss out the same on the wall just by an inch or two. Please measure your wall’s width, double it since you will be adding the top and bottom parts too. The space both horizontally and vertically between your battens should also be equal to create the perfect look.
Save Your Time
How can you save your time? By painting your battens beforehand! It takes a lot of time to paint your walls and battens and then dry them. It usually requires at least three paint coats to get the proper color, and, ideally, you paint them before you start cutting.
Do not paint the extra items you have kept in case you want to return them. Even after putting the battens on the wall, you will have to apply a finishing touch which will take time to dry, and you should paint the rest beforehand.
Remove Furniture
Before you start painting, measuring, even looking at how you want your wall to look, remove every piece of furniture out of that room. Be it a table or sofa, or even a carpet, and especially any hangings.
If you are changing your living room’s wall, you must remove any chandeliers you have. You should also remove your doors and toilet because this furniture will not only hamper your work but might get damaged too.
Removing them from their place has made the work even more comfortable. If you cannot remove them, tape them with multiple layers, which you can search online.
Wood Shims
Because putting too many nails will take a lot of time to paint and look bad, instead, you can use wood shims.
These will get in between your wall and Batten and fix everything right up. Yes, you can use paintable caulk too, but wood shims are way better.
They will clear everything straight away and will not cause any more problems. Try it for yourself and see the difference. You can find them both online and in offline stores.
DONTs
Avoid Extra Trips
Avoid going to the store to get extra supplies you need while putting your battens on the wall instead of stock them up while you purchase them in one go.
Online stores like Amazon or the offline Big Box stores have a return policy, so you can easily buy a couple of extra items for yourself in case the other ones get damaged, or you spill something on them. I have those extra items unopened you can quickly return them.
This way, you only must go once to get all your supplies for your DIY project.
Do Not Be Afraid to Spend A Little Extra
You see plenty of posts on Pinterest or Tumblrin, all DIYs wherein people suggest buying cheap boards, mainly to reduce cost.
However, things like wood should never be bought cheap, and you may never know how the wood’s quality is, whether it will fill in the gaps or not.
You do not want to end up filling the holes and applying the paint again and again. Hence, it is recommended that you spend an extra $2 – $3 and get the best wood material like Redwood, or Pine, or Cedar.
Nails and Walla
Two of the essential things that you should know are, firstly, do not assume that your home walls are straight.
Check first, touch your walls from every side and check where the gap is, where it is bent, etc., because, in the end, it will create havoc when you apply the battens.
Secondly, please do not put too many nails while assembling as they will take a lot of time to dry up and might not look good even after drying. So, either avoid them or try to put fewer.
Going to Take Long
This probably should not be on the list, but here it is. This DIY will require a whole weekend, so if you have small kids running around your house, or frequent visitors, now is the time to send the kids away and put a ‘DO NOT DISTURB’ sign on your front door.
Like we said, avoid the extra trips to the store. Bring in all the possible tools and battens you need and bring a couple of tools which can be used by chance, because you never know.
Also, paint everything beforehand only to avoid any chaos and extra time.
Conclusion
When fully finished, this board and Batten DIY willo take your breath away as to how good it looks. If you are going to create a DIY like the first one, you can put up an extra two batters and put your photos or souvenirs up there.
You can attach the coat hooks and hang your scarves or any ornament over there to make your entryway look as spectacular as possible. Because it is indeed the first thing, anyone would come to look at. You can even align carpets that match the color of your walls, or maybe a small bench?
In the second DIY, you can keep it as simple as possible. You can choose one color that you like the most, and you know it will look amazing on your home, and paint it.
You should also make sure beforehand what all wall hangings you want to keep, be it a painting, a chandelier, an ornament, whatever, and match them with your wall’s color. This way, if you feel that the two are not matching, you can easily switch.